The modem is used in the system to send SMS notifications and receive SMS commands.
To operate with a modem:
- Install the SIM card in the mobile phone and make sure that it is functional, check PIN-code;
- Insert the SIM card in modem;
- Turn on the power of the monitoring system;
- Configure the modem;
- Add SMS notifications and configure the logic or group notifications.
Configuring the modem for sending and receiving SMS
To configure the modem, use the modem settings tab (Main Menu→SMS messages):
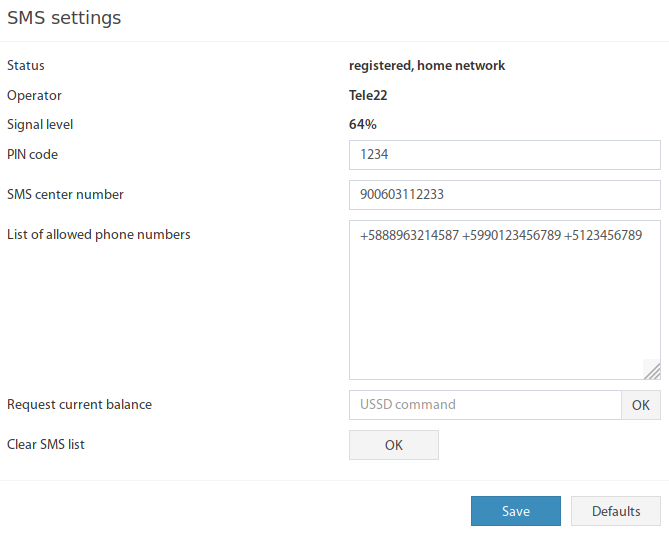
Fields characterizing the properties of the modem element in a system:
Status – the state of the cellular network;
- Operator – the state of the cellular network;
- Signal level – the signal level;
PIN code – pin-code of sim-card;
SMS center – SMS service center number, leave it blank to auto-detect;
We highly recommend writing the SMS center number in this field manually. Some SIM cards have problems with auto-detect features.
List of allowed phone numbers – list of numbers from which SMS commands are allowed. To separate numbers, use a space. Incoming SMS messages from other numbers are not processed. Supports up to 10 phone numbers (100 for VT9xx systems).
- Request current balance – the number on which the account balance is requested, to see the answer, click on the "OK" button and wait for an answer;
USSD is not supported in LTE mode. The USSD query has a specific format, usually starts with an asterisk, for example: *111# or *222*
Do not enter the phone number in this field.
Some operators abandoned the use of USSD and do not support it. - Clear SMS list – clear list of SMS messages.
The "List of SMS messages" contains up to 100 recent SMS messages (1000 for VT9xx systems) that the system or user attempted to send. When the device is rebooted, the list is not saved.
If the sim card has a pin, you must specify this pin in the corresponding field in the configuration form.
Attention!
After 3 incorrect attempts, you must remove the sim card and use the PUK code to unlock it.
If an error occurs during the operation of the modem, or the SIM card is not installed, or the PIN code is not correct, the message written into the log queue ("GSM modem: Error, check your SIM card and PIN code" or "GSM modem: modem error, restart smsd"). The message is displayed only 5 times in order not to overflow the log.
SMS messages
To add an SMS notification recipient, first, open the System Tree menu, further open window  →SMS:
→SMS:
Name – name of the notification. Can be arbitrary (name, the position of the recipient, ...);
Phone number – the telephone number to which the notification has to be sent.
Message text – text message can be in any language. Also in this field, you can use various macros (%1 - %8), which insert the current values of variables into the text.
To apply the settings, click the "Save" button. To test SMS, click the "Test" button.
When You press "Test", the system sends a message to test if the SMS is sent correctly. Test SMS may contain incorrect information about sensors (macros %1 and %2) for testing purposes only.
After filling in the notification parameters, you must specify the event (events) by which the SMS message will be sent. To do this, open the Preferences → Logic schemes → Add window and specify the condition for sending the SMS message in the logic. In one logic, it is possible to send SMS notifications to not more than 15 recipients for one or more events. If you need to send SMS notifications to more than 15 recipients in the same logic, then create new logic with the same input condition.
SMS messages are sent to the queue, which allows you not to wait until the end of sending the previous message. The information about the sent messages is displayed in the monitoring system log. The capacity of the queue is 100 messages, if overflowed, the sent messages are automatically deleted.
If an error occurs while the message is being sent, the message with the status of SMS send error is displayed in the log, the reasons of which may be:
the negative balance on the sim card account.
- low signal level;
wrong format or nonexistent recipient phone number.
If these items do not fit your situation, try to restart the monitoring system. Also, check the sending of messages from your mobile phone.
SMS commands
SMS commands are used for remote management by the monitoring system. Using these commands, you can read the system status, the status, and the measured value of individual sensors and a group of sensors, as well as control the relay switches (outlets). The phone numbers from which the remote control will be made must be added to the list of allowed numbers in the modem parameters editing window (Main menu → SMS messages → List of allowed phone numbers).
Attention!
In response to each SMS command, an SMS response message arrives, in case of an erroneous command, SMS with an error description and an example of the command comes. In one SMS message, there can be only one command for one element.
System, sensor, relays (outlets) status reading commands
Syntax. get [ID] or get [name], where ID is the "ID" number of the element, "name" is the name of the element. The get field is not case sensitive, you can use Get, GET. The name field is case-sensitive and must be enclosed in quotes. Also, the name of the requested sensor must be unique, otherwise, the answer may be incorrect.
Description. The command requests the status of the sensor or relay (sockets) and sends a response SMS to the phone from which the command came, describing the status of the sensor.
get system - get information about the system. The response contains the system device type, firmware version, system state, IP address, etc. Responses look like this:
System: VT335
Firmware: 2.7.4 b570
State: normal
Hostname: monitoring_unit_1
IP: 192.168.0.193
get [group name or ID] - get information about the group of sensors. Response contains a description of the group and a brief description of all the modules and sensors in the group. Responses look like this:
Group: test group [3001]
State: normal
Description: here if available

Analog-4[102001] normal 0
Onboard Temperature[201001] normal 30.20 C
Onboard Voltage DC[203001] normal 12.21 V
Attention!
If there are many sensors in the group, the answer may be too large.
get [sensor name or ID] - get information about the sensor. Responses look like this:
Element: Temperature-1 [201003]
State: normal
Value: 27.5 C
Commands for setting the status of the relay (sockets)
Syntax. set [ID] [state] or set [name] [state], where ID - the "ID" number of the element, "name" is the name of the element, "state" is the state to which you want to switch. The set and state fields are not case-sensitive. The name field is case-sensitive. The state field takes one of the following states: on - enable, off - disable.
Description. The command will switch the relay or socket under the state parameter and send the reply SMS to the phone from which the command came, about the result of the command.
Illustration.
set '302001' on - turn on relay number 302001;
set 'Outlet-1' on - turn on relay Outlet-1;
- set '302002' off - turn off relay number 302002;
set 'Outlet-2' off - turn off relay Outlet-2.
Response. In this case the response message looks like this: The element (element name) was switched on or The element (element name) was switched off.
Relay (Socket) pulse setting commands
Syntax. set [ID] pulse {duration} or set [name] pulse {duration}, where ID is the "ID" number of the element, "name" is the name of the element, duration is the delay time in seconds. The name field is case-sensitive. The value range of the duration field is from 1 to 120. The duration field does not need to be specified, the previously set value is applied.
Description. The command switches the status of the relay (sockets) to the opposite one twice, with the time delay specified as the duration parameter in seconds.
Illustration.
set '302003' pulse 15 - the impulse to the relay number 302003 with a delay of 15 seconds;
set 'Relay-1' pulse 110 - the impulse to the relay named Relay-1 with a delay of 110 seconds;
- set 'Outlet-2' pulse - sending a pulse to an outlet with the name Outlet-2 with a previously set delay.
Response. In this case the response message looks like this: The element (element name) was switched.
Logic control commands (logic)
Syntax. logic [id] [state] {duration}, logic * [state], where ID – the "Logic number" of the logic (the symbol '*' for all logics), state - the state into which the logic goes ("off", "on"), duration - the time of logic shutdown in seconds. All fields are case insensitive.
Description. Commands disable or enable logic. The duration is indicated only when one logic is disabled.
Illustration.
- logic 1 off 10 - disabling logic with the number 1 for 10 seconds;
- logic 1 on - the inclusion of logic with the number 1;
- logic * off - disabling all logic for 24 hours;
- logic * on - including all logic.
Response. In this case the response message looks like this: OK.
Sending SMS using third-party programs
To send SMS, you can use, for example, the cURL utility. Either other programs with similar functionality.
gcc -O2 -o sendsms sendsms.c
Script for sending SMS
#!/bin/bash# SMS sending script for version 2.4.x and higherusage(){cat << EOFusage: $0 optionsOPTIONS: -?,-h Show this message -H Hostname or IP address -u User name -p Password -P Phone for sending -m Message for sendingEOF}HOSTIP=USERNAME=PASSWORD=TOPHONE=MESSAGE='Test'while getopts “hH:u:p:P:m:” OPTIONdo case $OPTION in h) usage exit 1 ;; H) HOSTIP=$OPTARG ;; u) USERNAME=$OPTARG ;; p) PASSWORD=$OPTARG ;; P) TOPHONE=$OPTARG ;; m) MESSAGE=$OPTARG ;; ?) usage exit ;; esacdoneif [[ -z $HOSTIP ]] || [[ -z $USERNAME ]] || [[ -z $PASSWORD ]] || [[ -z $TOPHONE ]] || [[ -z $MESSAGE ]]then usage exit 1fi# 1) password hashHASH=`echo -n ${PASSWORD} | openssl dgst -sha1 | awk '{print $NF}'`# 2) authorizationRESPONSE=`curl -s -d "querytype=auth&name=${USERNAME}&h=${HASH}" "${HOSTIP}/engine.htm"`# or for HTTPS#RESPONSE=`curl -s -d "querytype=auth&name=${USERNAME}&h=${HASH}" -k "https://${HOSTIP}/engine.htm"`# 3) session keyKEY=`echo -n ${RESPONSE} | awk -F"\"" '{print $4}'`# 4) send SMScurl -d "querytype=send_sms_message&k=${KEY}" --data-urlencode "to_phone=${TOPHONE}" --data-urlencode "message=${MESSAGE}" ${HOSTIP}/engine.htm > /dev/null 2>&1# #curl -d "querytype=send_sms_message&k=${KEY}" --data-urlencode "to_phone=${TOPHONE}" --data-urlencode "message=${MESSAGE}" -k https://${HOSTIP}/engine.htm > /dev/null 2>&1 |
In case of errors, leave comments below on the page or at our forum. Please indicate in the message the current version of the firmware of the monitoring system (System menu→About this system→Firmware version).