...
To switch on/off all relays for all units go in to the "Main menu" " " >> "System Tree">> choose Choose a "Relay" element you want to configure and click on it >> a A modal window with properties will pop up:
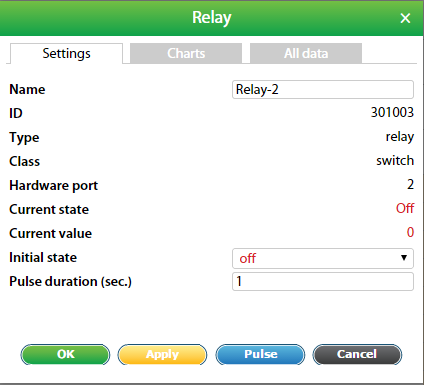
1 | Name | Relay-# by default. Can be changed. |
2 | Group | A group can be selected for visual display in the "Group tree" menu |
3 | Hardware port | Port 1 = relay 1/outlet 1; port 2 = relay 2/outlet 2 and so on. |
4 | Current state | Shows current state of the relay |
5 | Current value |
|
6 | Initial state |
|
7 | New state |
|
8 | Pulse duration | Measured in seconds. 1-second minimum. |
Example: The relay is "Off". Let's say we need to switch it "On" for 30 seconds. In the field "New state" choose "Pulse"; specify "Pulse duration" for 30 sec. Then press "Apply" or "Save". The relay will switch to the "On" state for 30 seconds. Then it will return to the "Off" state.
Outlets switching
To start managing relay switching of VT604 or VT608 units, go to "Main menu" "" >> "Outlets" menu. You should see the outlets:
...
First, choose which outlets you need to switch to "On" or "Off" state, then press "Apply". The interface window will update itself in a moment: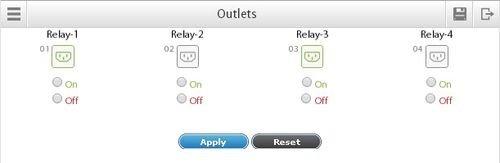
...
For the picture above, we've switched "On" Relay-1 (Outlet-1) and Relay-3 (Outlet-2). They are highlighted in green color. Outlet-2 and Outlet-4 are currently off.
...
| Info |
|---|
The "Pulse" parameter always changes relay's state to an opposite state. |
| Child pages (Children Display) |
|---|